Thursday, December 10, 2015

Deploying a Django App to AWS Elastic Beanstalk


                                    Deploying a Django App to AWS Elastic Beanstalk

Introduction


Amazon Web Services (AWS) comprises dozens of services, each of which exposes an area of functionality. While the variety of services offers flexibility for how you want to manage your AWS infrastructure, it can be challenging to figure out which services to use and how to provision them.
With Elastic Beanstalk, you can quickly deploy and manage applications in the AWS cloud without worrying about the infrastructure that runs those applications. AWS Elastic Beanstalk reduces management complexity without restricting choice or control. You simply upload your application, and Elastic Beanstalk automatically handles the details of capacity provisioning, load balancing, scaling, and application health monitoring. 

The following steps is tell you  how to setup and deploy a Django application toAmazon Web Services (AWS) all while remaining sane.

Technology/Tool used
  • Python
  • Django
  • Amazon Elastic Beanstalk,EC2,S3 and RDS
  • EB CLI . 3 . X
  • Postgresql/mysql
Note: Amazon Elastic Beanstalk does not support Python 3 natively

Step 1 :
  • Create main root directory 
  • Create  a virtualenv [ (1)pip install virtualenv,virtualenv envname ]
  • Install packages using pip commands [pip install django==1.8.5]
  • Create a package using command (django-admin.py startproject main_website
  • Create a apps inside the main_website project using[python manage.py startapp home]
  • Install the apps in settings.py
  • Set the database according your needs
  •  Create a requirements.txt file inside the root directory [ pip freeze > requirements.txt]
  • add file .gitignore in root directory
Step 2 :
  • Install awsebcli in your machine (using pip , pip install awsebcli)
  • Configure aws in your machine with key and access id [ aws configure command in your machine it will ask you to enter the credentials , add the credentials then  aws will created ]
  • Locate the project root directory [ using cd command cd eb_main_website ]
Step 3 :
  • Test eb Installation is working fine [ eb --version ]
Step 4 :
  • Configure EB - Initialize project with aws 
  • Enter eb init
  • Your need to enter the Credentials,Application name,Python version,SSH,RSA keypair
  • Once you enter the these data eb init will create a file in .elasticbeanstalk  in main directory , there you can see the file called config.yml
Project Structure

  -- eb_main_website [ Main Directory ]
   |
   |----.ebextensions
   |    |
   |   |---01-main_website.config
   |   |---02_python.config
   |
   |----.elasticbeanstalk
   | |
   | |---.config.yml
   | |---.iod-test.env.yml
   |
   |----main_website
   | |
   | |---apps
   | | |
   | | |---staffs
   | |---home
   | |   |---__init__.py
   | |   |
   | |   |---management
   | |   |
   | |   |---__init__.py
   | |   |
   | |   |---commands
   | |   |
   | |   |--- __init__.py
   | |   |
   | |   |--- createsu.py
   |    |
   |    |---main_website
   | |
   | |--- __init__.py
   | |
   | |--- settings.py
   | |
   | |--- urls.py
   | |
   | |--- wsgi.py
   |
   |----www
   | |
   | |--static
   |
   |---- .gitignore
   |
   |---- error.txt
   |
   |--- requirements.txt


Saturday, November 14, 2015

Braintree payment gateway integration with Django


                       Braintree  payment gateway integration with Django

Introduction

Here Im going to tell you How to integrate the Braintree payment gateway with Django based application. I really thankful to Braintree support team because when i start to integrate i feel really hard. i have successfully completed the project and here i'm put the Github link for demo project.

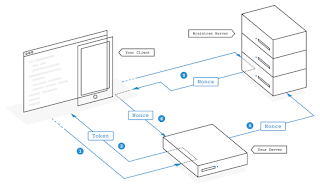
Workflow Diagram 


Integration

Step 1 :  Create Sandbox account with  Barintree  :- Create sandox account

Step 2 :  Setup Client

Step 3 : Setup Server

Step 5 : Have fun .... with Brain tree

BrainTree Integration with Django Project

Create the Sandbox account with  braintree , they will provide the merchant id, private and public key
Install braintree in your env using pip ( pip install braintree ).

Add the keys and merchant id with project settings

settings.py

BRAINTREE_MERCHANT = 'dznq5k44zc3qrycm'
BRAINTREE_PUBLIC_KEY = 'ttkr358rbpfnjvgn'
BRAINTREE_PRIVATE_KEY = 'dcfa177a5f71e00370323f17221e6cea'

Configure the Braintree with this above credentials

Views.py

from django.conf import settings

import braintree
braintree.Configuration.configure(braintree.Environment.Sandbox,
 merchant_id=settings.BRAINTREE_MERCHANT,
 public_key=settings.BRAINTREE_PUBLIC_KEY,
 private_key=settings.BRAINTREE_PRIVATE_KEY)

Genrate a client token in server side and render to the client side for processing payment method nonce.

Views.py

@login_required
@csrf_exempt
def checkout(request):
rg = request.POST.get
amount =  request.POST.get('prise') // when user click the subscription for payment
user = Staff.objects.get(id=request.user.id)
a_customer_id = ''
if not user.customer_id:
result = braintree.Customer.create({
   "first_name": user.first_name,
   "last_name": user.last_name,
   "company": "Braintree",
   "email": user.email,
   "phone": "312.555.1234",
   "fax": "614.555.5678",
   "website": "www.example.com"
})
if result.is_success:
user.customer_id = result.customer.id
user.save()
a_customer_id = user.customer_id
else:
a_customer_id = user.customer_id
if not user.client_token:
client_token = client_token = braintree.ClientToken.generate({
   "customer_id": a_customer_id
})
user.client_token = client_token
user.save()
else:
client_token = user.client_token

varibles ={'amount':amount,'client_token':client_token}
return render(request, 'checkout.html',varibles)

Setup Client 

checkout.html

<div class="form-style-5">
    {{amount}}
<input type='hidden' id='client_token' value='{{client_token}}'> // client token from server side
<form id="checkout" method="post" action="/payment">
    <div id="payment-form">
       <input type='hidden' name='amount' value='{{amount}}'> // amount
       <input type='text' name='amount' value='{{amount}}' readonly>
    </div>
    <input type="submit" value="Subcribe"> // Submit Button
</form>

</div>
<script src="https://js.braintreegateway.com/v2/braintree.js"></script>
<script>

var clientToken = document.getElementById('client_token').value;
// creating payment method nonse

braintree.setup(clientToken, "dropin", {
  container: "payment-form"
});
</script>

How the Client look ?


When the user click on the submit button it will post the payment method nonce to server side.


Create Transcation

@login_required
@csrf_exempt
def payment(request):
if request.POST:
if request.POST.get("payment_method_nonce"):
                        // payment method nonce from client side.
nonce_from_the_client =  request.POST.get("payment_method_nonce")
staff = Staff.objects.get(id=request.user.id)
sub = Subscription()
sub.staff = staff
sub.payment_nonce = nonce_from_the_client
sub.amount = request.POST.get("amount")
sub.save()
result = braintree.Transaction.sale({
   "amount": sub.amount,
   "payment_method_nonce": sub.payment_nonce
})
transaction_id =  result.transaction.id
sub.txnid = transaction_id
sub.save()
message = ''
if result.is_success: // transaction success or not
sub.result = True
sub.save()
message =  'Transaction successfully completed'+' : '+ transaction_id
varibles ={'message':message}
return render(request, 'success.html',varibles)
else:
message = 'Error Transaction Faild'

varibles ={'message':message,}
return render(request, 'checkout.html',varibles)
else:
message = 'No transaction'

varibles ={'message':message,}
return render(request, 'checkout.html',varibles)

Transaction Results in my braintree account


Demo Project i have pushed in to the github , you can download and check it yourself.

Project codebraintree payment gateway demo project

                                                            Thank you.


Tuesday, November 10, 2015

Django override save method

Django override save method (two ways)


1)
 class Blog(models.Model):
  name = models.CharField(max_length=100)
  tagline = models.TextField()

  def save(self, *args, **kwargs):
    do_something()
   # Call the "real" save() method in the base class 'models.Model'
    super(Blog, self).save(*args, **kwargs) <-----
    do_something_else()

 is equal to

2)
  class Blog(models.Model):
   name = models.CharField(max_length=100)
   tagline = models.TextField()

   def save(self, *args, **kwargs):
     do_something()
    # Call the "real" save() method in the base class 'models.Model'.
     models.Model.save(self, *args, **kwargs) <----- Note: self
     do_something_else()

Thursday, October 8, 2015

Selenium Tutorial: Web Scraping with Selenium and Python [ by argument passing example: python filename.py 2015/05/05 ]


           Web Scraping with Selenium and Python


Imagine what would you do if you could automate all the repetitive and boring activities you perform using internet, like checking every day the first results of Google for a given keyword, or download a bunch of files from different websites.

In this code you’ll learn to use Selenium with Python, a Web Scraping tool that simulates a user surfing the Internet. For example, you can cial accounts, simulate a user to test your web application, and anything you find in your daily live that it’s repetitive. The possibilities are infinite! :-) 

Here my example code for scrap the data from the sports website. grab all the data  and filter the data according to category's like football,cricket,basketball etc , this code will help you to detail understand about the working selenium with python ,and how to  scrap the data using the technology 

Requirements:
  
     Step 1 : Create Virtual ENV 

               You need to install virtual environments in your local machine if virtualenv is installed in                    your system create a virtualenv using this command : virtualenv scrapy. if you dont                            installed the virtual env install virtualenv in your root in your machine : sudo pip install                      virtualenv. activate the env using source scrapy/bin/activate.

    Step 2 : Install dependencies in your env.

  •                 BeautifulSoup==3.2.1
  •                 EasyProcess==0.1.9
  •                 PyVirtualDisplay==0.1.5
  •                 argparse==1.2.1
  •                 beautifulsoup4==4.4.1
  •                 selenium==2.47.3
  •                wsgiref==0.1.2
Step 3 :  download the code from the git hub and run it. you can see the script downloading the match               details accodring to category wise and make it in txt file.
              This code you can run it two way with argument and with arguments.
              if you run the code as python filename.py : you can see the details according to today and tomorrow. and if you run the code like python filename.py 2015/05/05 , you will get the match details according to the   this date ( 2015/05/05 ).

please make sure the pip installed in your machine.

My Script for scrapping is : scrapping file


Sunday, October 4, 2015

Asynchronous Tasks With Django and Celery

Asynchronous Tasks With Django and Celery


Django Celery Architecture 


When i was working on projects in  Django ,  one of the most frustrating thing I faced was need to run a bit of code periodically, i wrote my own function is for sending newsletter on the Monday morning 10 am , this time i faced lots of problem because some times my function did not working properly don't mean's syntactically , so i may think to start where i done wrong , is right no ? then how the problem is occurring , after that finally i found a solution for do some task periodically we can use Celery.

What is Celery ?

Celery is an asynchronous task queue/job queue based on distributed message passing. It is focused on real-time operation, but supports scheduling as well.” For this post, we will focus on the scheduling feature to periodically run a job/task.
Why is this useful?
  • Think of all the times you have had to run a certain task in the future. Perhaps you needed to access an API every hour. Or maybe you needed to send a batch of emails at the end of the day. Large or small, Celery makes scheduling such periodic tasks easy.
  • You never want end users to have to wait unnecessarily for pages to load or actions to complete. If a long process is part of your application’s workflow, you can use Celery to execute that process in the background, as resources become available, so that your application can continue to respond to client requests. This keeps the task out of the application’s context.
What you need ?

Celery requires a message transport to send and receive messages. The RabbitMQ and Redis broker transports are feature complete, but there’s also support for a myriad of other experimental solutions, including using SQLite for local development.
Celery can run on a single machine, on multiple machines, or even across data centers.

First Steps with Celery

Celery is a task queue with batteries included. It is easy to use so that you can get started without learning the full complexities of the problem it solves. It is designed around best practices so that your product can scale and integrate with other languages, and it comes with the tools and support you need to run such a system in production.

In this blog you will learn the absolute basics of using Celery. You will learn about;
  • Choosing and installing a message transport (broker).
  • Installing Celery and creating your first task.
  • Starting the worker and calling tasks.
  • Keeping track of tasks as they transition through different states, and inspecting return values.
     Choosing a Broker
         Celery requires a solution to send and receive messages; usually this comes in the form of          a separate service called a message broker.
         There are several choices available, including: (please search google for more details )
                  RabbitMQ
                  Redis
                  Using a database
                  Other brokers

 Installing Celery

 Celery is on the Python Package Index (PyPI), so it can be installed with standard Python tools like  pip or easy_install:

$ pip install celery
Example :

Let’s create the file tasks.py:

from celery import Celery

app = Celery('tasks', broker='amqp://guest@localhost//')

@app.task
def add(x, y):
    return x + y

Example Project :

Clone my project  url : git cloe https://github.com/renjithsraj/photogallery.git

Project Description :

This Project mainly looking for basic understand about the periodic task ( scheduling task ) in django. The scope of the project is collect the images from the flickr latest images and store in to data base in every two minute (change with your own time ) make it a gallery.
heroku url : https://flickercollection.herokuapp.com/
Configuration:
step 1 : Create Virtualenv using (virtualenv env)

step 2 : open terminal activate the env

step 3 : clone the project command ( git clone https://github.com/renjithsraj/photogallery.git )

step 4 : make the path to project ( cd photogallery in linux )

step 5 : install packages which we required for this project ( pip install -r requrements.txt )

step 6 : install broker here im used redis ( if install redis server also in your local machine )

step 7 : open new terminal start the redis server ( redis-server command )

step 8 : Running Locally
    Ready to run this thing?

    With your Django App and Redis running, open two new terminal windows/tabs. In each new window, navigate to your project directory, activate your virtualenv, and then run the following commands (one in each window):

    $ celery -A pincha worker -l info
    $ celery -A pincha beat -l info

    When you visit the site on http://127.0.0.1:8000/ you should now see one image. Our app gets one image from Flickr every 2 minutes: ( here i just take images freequent intervel please make your intervel )
Help !!
Please feel free to contact me : renjithsraj@live.com

Friday, October 2, 2015

Rest API with Django Rest Framework


How to Create a RestAPI's with Django Rest Framework 


When I start to write rest api's in django i used django-tastypie , but the problem is  almost all the my clients and my friends are done RestAPI's  it in DRF(Django Rest Framework) , so i forced  to learn DRF. when i start write Rest API's with DRF it's really going awesome.I am currently using Django REST Framework quite extensively.  It is really easy to extend their Serializer base class to create custom serializers and resources, although their default Serializer handles a lot of different types so you may not need to.  I'll admit the documentation for DRF is a bit disorganized, but the source code itself is well-documented and there are good examples included in the documentation.  

I decided on using DRF after getting started trying to do the same thing with TastyPie.  (In case you didn't know, Piston isn't being actively maintained, last time I checked.)   I found DRF to be more flexible than TastyPie, less opinionated, and wonderfully architected.  And the API Browser that comes automatically with DRF has proved itself to be invaluable.  The framework is seriously in the top two or three Django add-ons that I've found as far as quality, ease-of-use, and ingenuity goes, its a wonder that the documentation isn't up to par with the framework itself.

please clone my git project then you can see the how i create rest API's for a movie store , it include the database and everything,
Just clone the project locally and install the package using pip install -r requirements.txt , and run it locally you can see the movie list , filtering and all 
The project Description : This Project have two user  admin and User , admin can add , edit ,remove movies and the user can only see and searching the movies , this project telling you about the permissions and searching, filtering and etc, 
credentials for the admin user is : username : admin , password : admin

git hub url is : https://github.com/renjithsraj/storemovie

heroku url is : storemovie.herokuapp.com


Thursday, October 1, 2015

Remove .pyc files in your project


                         REMOVE .pyc FILES IN YOUR DJANGO PROJECT


  1. Remove .pyc files using git rm *.pyc. If this not work use git rm -f *.pyc
  2. Commit git commit -a -m 'all pyc files removed'
  3. Push git push
  4. In future commits you can ignore .pyc files by creating a .gitignore file